Cargo-Planner Docs
Customizable Load plan Layouts
Cargo-Planner allows you to fully customize how your load plans are presented. Instead of a fixed format, you can create custom layouts by arranging different information blocks on a visual canvas. This gives you complete control over what information is displayed and how it’s organized for different audiences - whether it’s detailed technical plans for warehouse staff or compact summaries for customers.
Overview
The customizable layout system lets you:
- Drag and drop blocks to arrange your loadplan exactly how you want it
- Choose from 18 different block types (3D views, tables, notes, instructions, etc.)
- Configure each block with specific settings
- Show or hide blocks based on conditions (e.g., only show photos if they exist)
- Create multiple layouts for different purposes (warehouse, customer, manager)
- Print and share with professional formatting
Accessing the Layout Builder
There are two ways to access the layout builder:
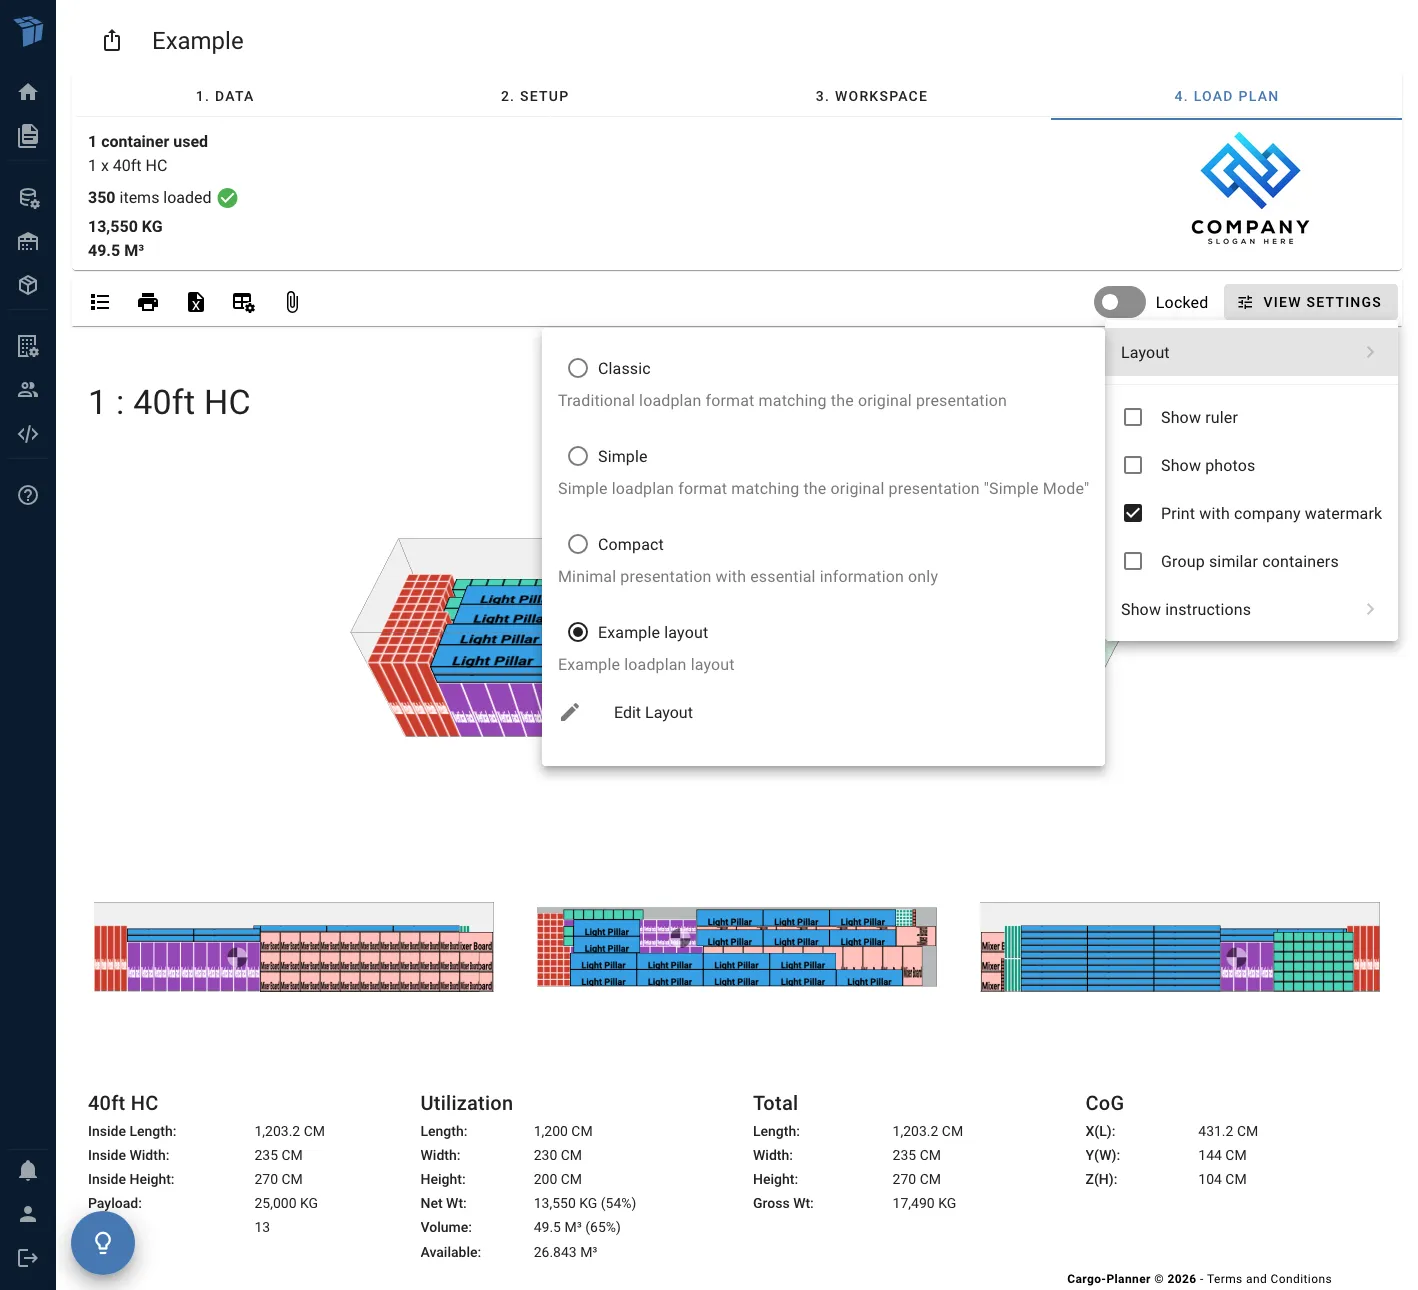
From the Loadplan Page
- Open any load plan
- Click the View Settings button in the toolbar
- Select Layout from the menu
- Choose a layout or click Edit Layout to customize it
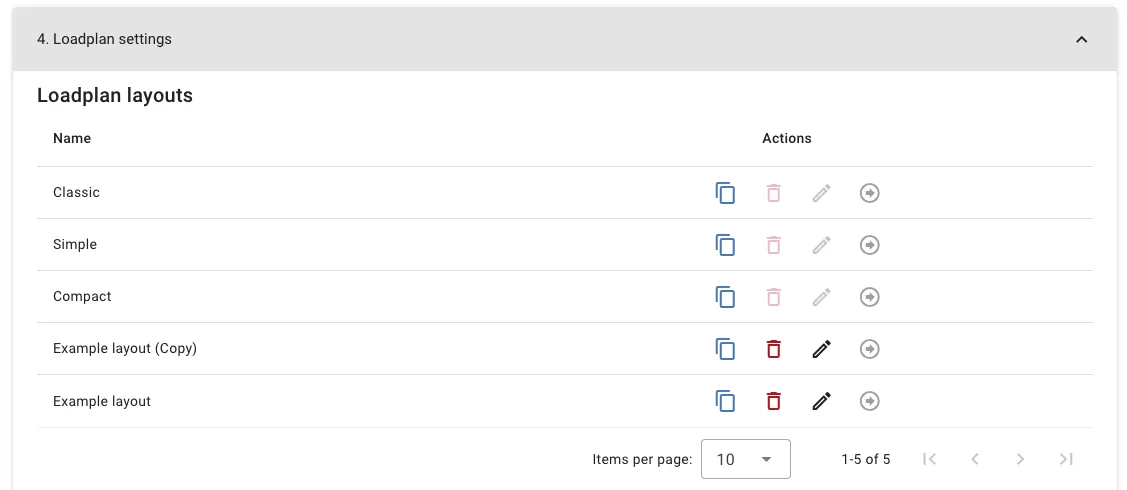
From the Main Menu
Navigate to Company Settings → 4. Loadplan settings → Loadplan Layouts to see all your layouts and create new ones.
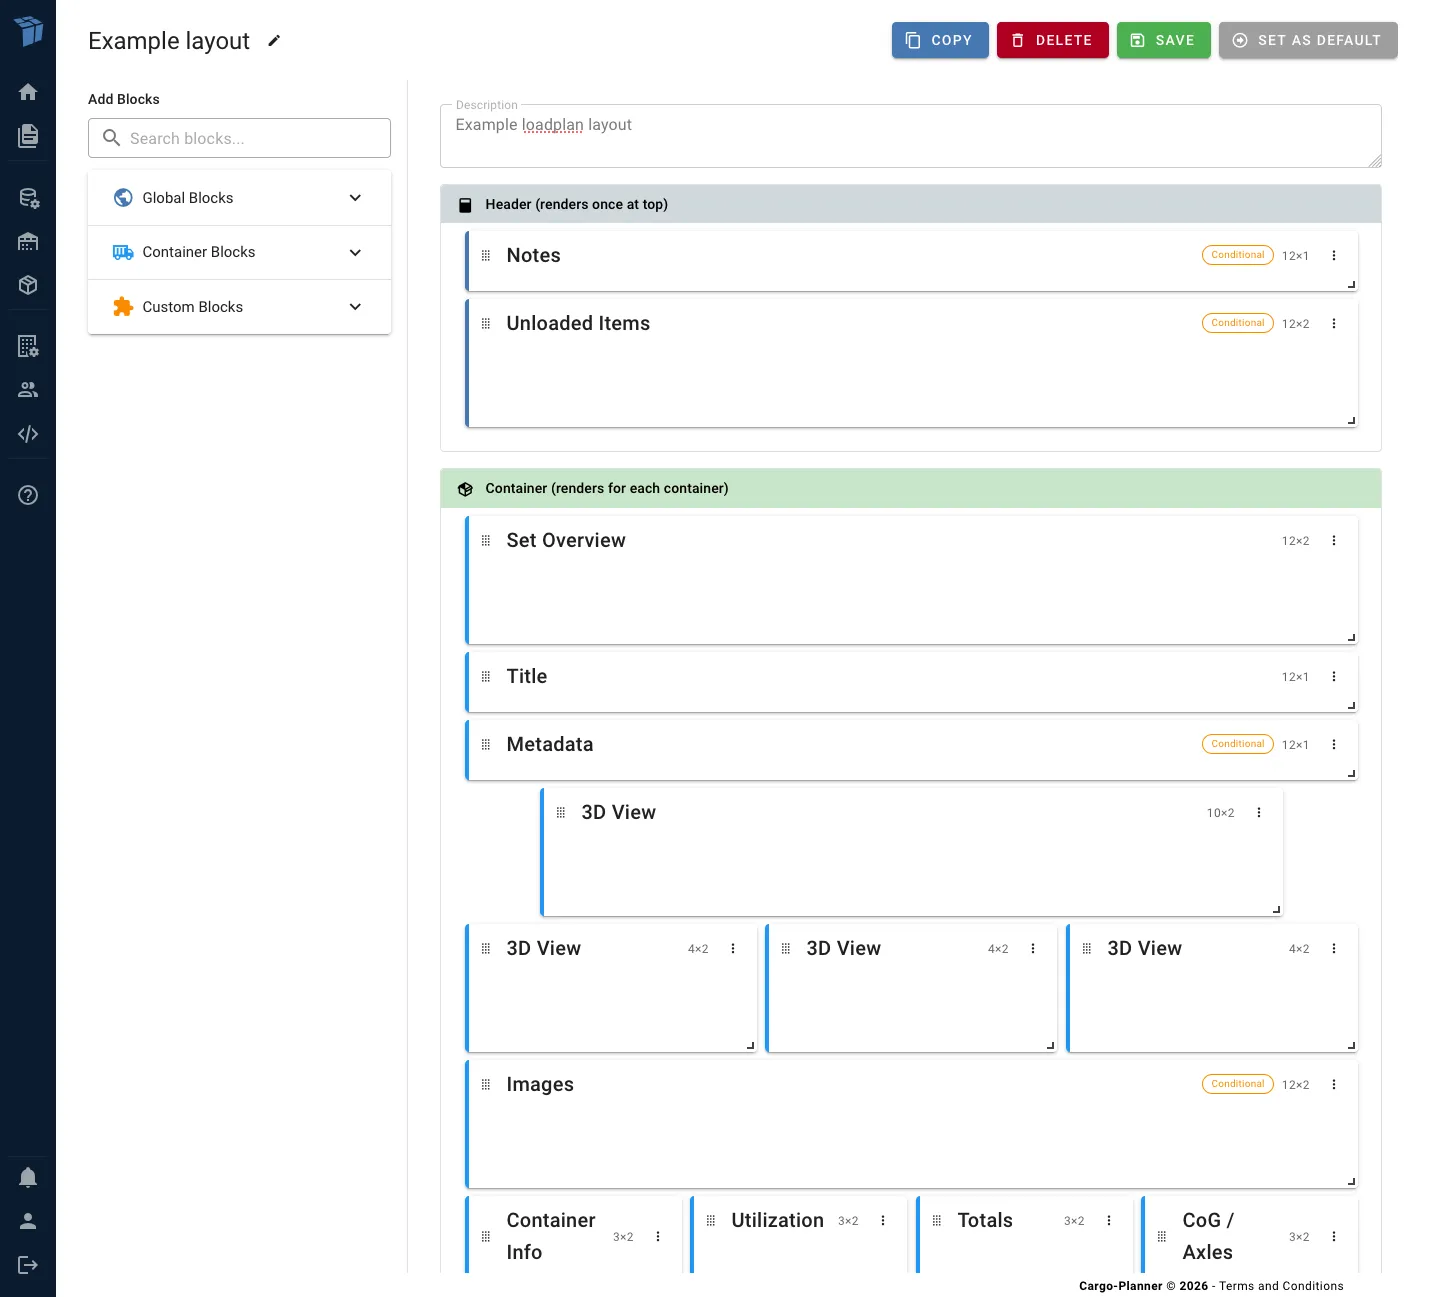
Layout Builder Interface
The layout builder consists of three main areas:
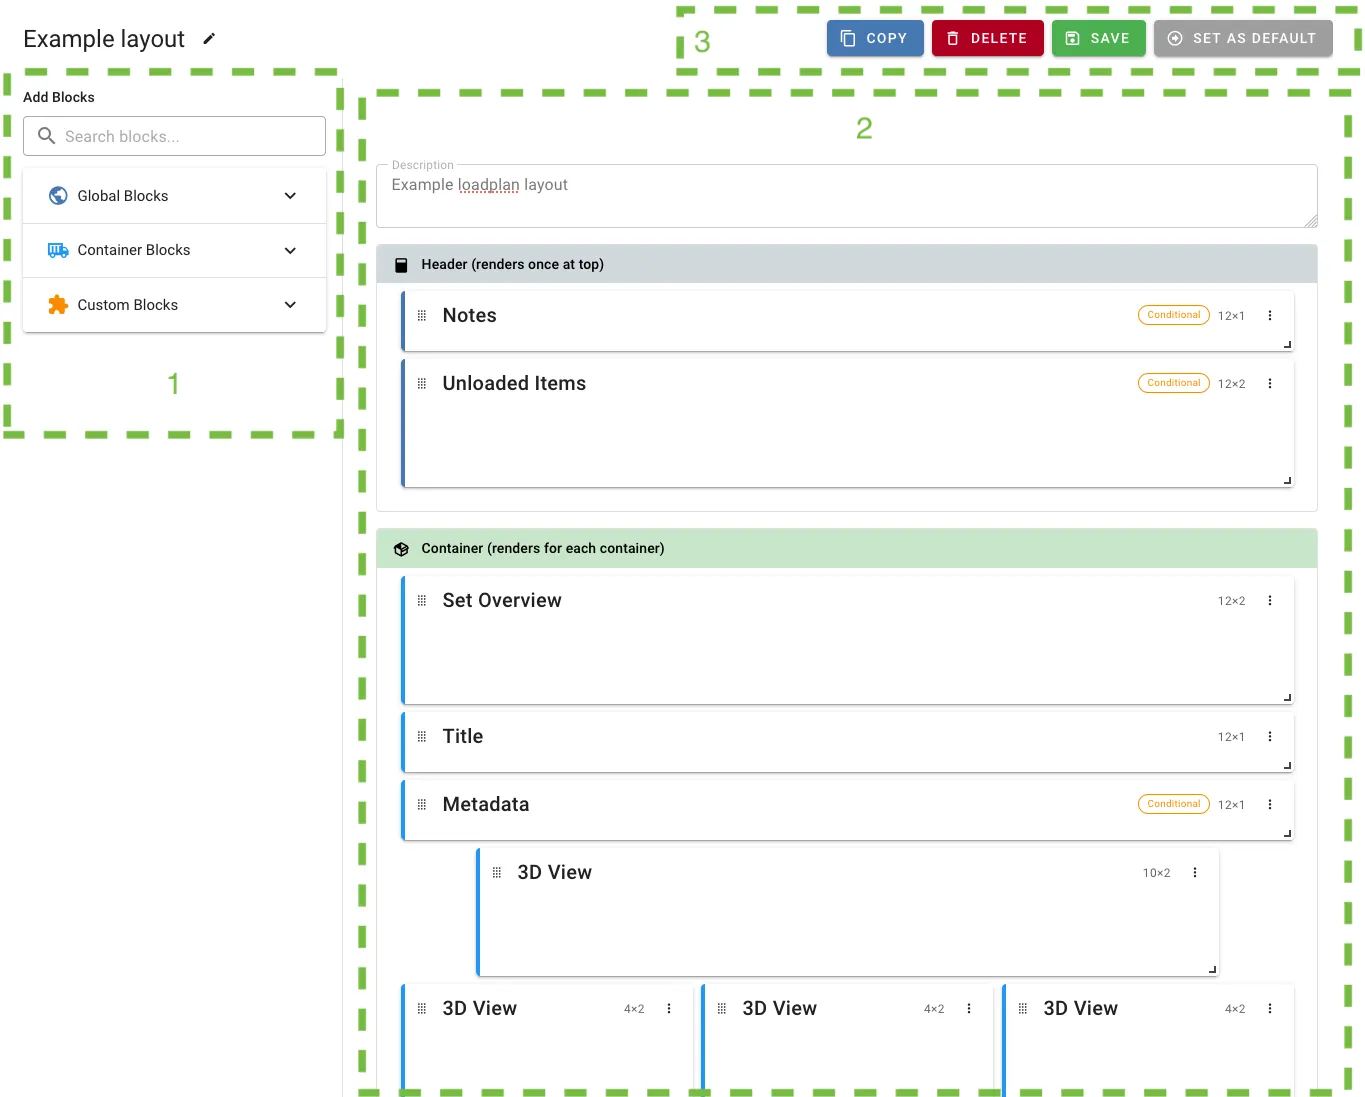
1. Block Palette (Left Sidebar)
Browse available blocks organized by category:
- Global blocks - Display once for the entire loadplan (summary table, notes, unloaded items)
- Set blocks - Multi-container set visualizations
- Container blocks - Display for each container (3D views, item tables, instructions, etc.)
- Custom blocks - Spacers, page breaks, custom text
Click any block to add it to your layout.
2. Canvas (Center)
The main editing area where you arrange blocks on a 12-column grid. You can:
- Drag blocks to reposition them
- Resize blocks by dragging the corners
- Click blocks to configure their settings
- Delete blocks using the trash icon
3. Toolbar (Top)
- Layout name - Click to rename your layout
- Copy - Create a copy of the loadplan
- Delete - Delete the visible layout
- Save - Save your changes
- Set as default - Set the current layout to be the default one to be used in loadplans
Understanding Sections
Layouts are divided into three sections that control when blocks are rendered:
Header Section
Blocks here render once at the top of your loadplan. Best for:
- Summary tables
- Loadlist notes
- Unloaded items
- Company information
Container Section
Blocks here render for each container. Best for:
- 3D views
- Container information
- Item tables
- Loading instructions
- Container-specific notes
Footer Section
Blocks here render once at the bottom of your loadplan. Best for:
- Terms and conditions
- Contact information
- Custom disclaimers
Available Block Types
Global Blocks
Summary Table
Displays overall loadlist statistics including total containers, weight, volume, and utilization.
Notes
Shows loadlist notes and loadplan notes in an organized format.
Unloaded Items
Lists cargo items that couldn’t be loaded into any container.
Set Blocks
Set Overview
Displays a multi-container set visualization showing how containers are arranged together (useful for flatracks, open-tops, etc.).
Container Blocks
Container Title
Shows the container name and number.
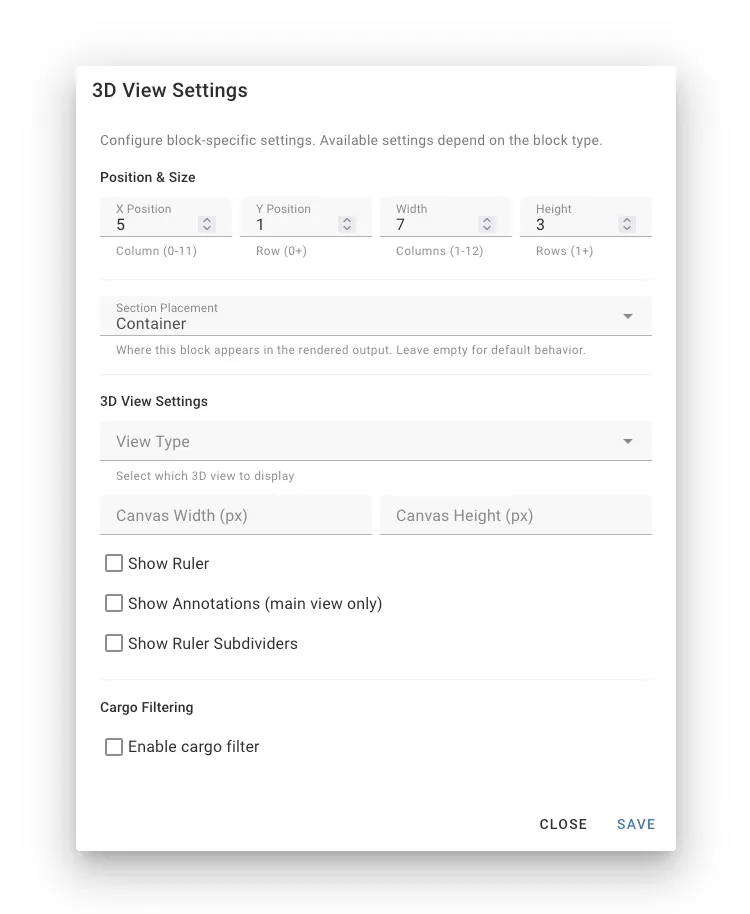
3D View
Displays an interactive 3D visualization of the loaded container. Configure:
- View type: Main, side, top, or front perspective
- Canvas size: Adjust the display size
- Show ruler: Display dimension markers
- Show annotations: Display cargo labels
Container Images
Shows photos attached to the container.
Container Info
Displays container dimensions, payload capacity, and cost information.
Container Utilization
Shows weight and volume utilization with percentage bars.
Container Totals
Displays total weight, gross weight, volume, and Out of Gauge (OoG) information.
Center of Gravity
Shows center of gravity position and axle weight distribution (critical for transport safety).
Loading Instructions
Step-by-step instructions for loading the container. Configure:
- Mode: By layers, by stacks, or by custom property
- Show secondary equipment: Include pallets, frames, etc.
Items Table
A detailed table of all cargo items in the container. Configure:
- Show totals: Display sum row at the bottom
- Flatten items: Group by SKU instead of showing individual items
Container Notes
Displays notes specific to this container.
Container Metadata
Shows custom metadata fields attached to the container.
Custom Blocks
Custom Text
Add your own text with support for formulas. You can use expressions to display calculated values.
Settings:
- Content: Your text (supports formulas like
{total_weight}) - Alignment: Left, center, or right
Spacer
Adds vertical space between blocks for better layout spacing.
Settings:
- Height: Adjust the spacer height
Page Break
Forces a page break when printing or generating PDFs.
Settings:
- Break type: Before or after the block
Block Settings
Every block can be configured with specific settings. To access settings:
- Click the settings icon (gear) on any block in the canvas
- Adjust the available options
- Click Save to apply
Common Settings
Most blocks support these settings:
- Section: Header, container or footer section
- Width: Number of columns (1-12) the block occupies
- Height: Number of rows the block occupies
Block-Specific Settings
Each block type has unique settings relevant to its function:
- 3D View: View angle, canvas size, ruler, annotations
- Items Table: Show totals, flatten items
- Instructions: Mode (layers/stacks/by-prop), show secondary equipment
- Custom Text: Content, alignment, formulas
Visibility Conditions
Make blocks appear or disappear based on specific conditions. This is useful for showing information only when it’s relevant.
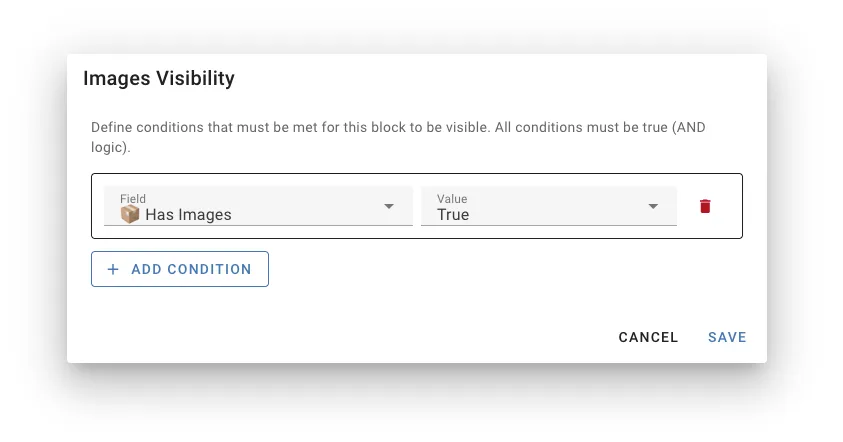
How to Add Conditions
- Click the settings icon on any block
- Navigate to the Visibility tab
- Click Add Condition
- Configure:
- Field: What to check (e.g.,
simpleMode,hasImages) - Operator: How to compare (equals, not equals, greater than, etc.)
- Value: What to compare against
- Field: What to check (e.g.,
Example Use Cases
Show photos only when they exist:
- Field:
hasImages - Operator:
equals - Value:
true
Hide detailed instructions in simple mode:
- Field:
simpleMode - Operator:
equals - Value:
true
Show set overview only for first container in set:
- Field:
isFirstInSet - Operator:
equals - Value:
true
Available Condition Fields
simpleMode- Whether simple mode is enabledhasImages- Container has attached photoshasContainerNotes- Container has noteshasMetadata- Container has custom metadataisFirstInSet- This is the first container in a multi-container setshowInstructions- Loading instructions mode (‘layers’, ‘stacks’, ‘by-prop’, or null)flattenItems- Items table is flattenedshowRuler- Ruler is visible on 3D views
Managing Layouts
Creating a Layout
- Go to Settings → Loadplan Layouts
- Click New Layout
- Give it a name (e.g., “Warehouse Layout”, “Customer Summary”)
- Start with an empty canvas or duplicate an existing template
- Add and arrange blocks
- Save your layout
Using Templates
Cargo-Planner includes a Classic template that replicates the traditional loadplan format. This is a great starting point:
- Find the Classic template in your layouts list
- Click the Copy button
- Give your copy a new name
- Customize it to your needs

Setting a Default Layout
Your default layout is automatically used for all loadplans:
- Go to Settings → Loadplan Layouts
- Click the Arrow icon next to the layout you want as default
- The layout is now your active default
You can still switch layouts for individual loadplans using the View Settings menu.
Editing a Layout
- From the loadplan page, click View Settings → Layout → Edit Layout
- Or go to Settings → Loadplan Layouts and click the edit icon
- Make your changes in the builder
- Click Save
Duplicating a Layout
Create variations of existing layouts:
- Go to Settings → Loadplan Layouts
- Click the copy icon next to any layout
- Enter a new name
- The duplicate opens in the editor ready to customize
Renaming a Layout
- Open the layout in the builder
- Click the layout name at the top
- Enter a new name
- Click Save
Deleting a Layout
- Go to Settings → Loadplan Layouts
- Click the trash icon next to the layout
- Confirm deletion
Note: System templates (like Classic) cannot be deleted, but you can duplicate and modify them.
Advanced: Query Parameters
When sharing loadplan URLs, you can override layout settings using query parameters:
/loadlist/123?layout=my-custom-layout&showRuler=true&simpleMode=falseAvailable parameters:
layout- Layout ID to useshowRuler- Show ruler on 3D views (true/false)simpleMode- Enable simple mode (true/false)flatItems- Flatten items table (true/false)showImages- Show container photos (true/false)instructions- Instruction mode (‘layers’, ‘stacks’, ‘by-prop’)
This is useful for:
- Automated PDF generation via API
- Sharing links with specific display settings
- Template URLs for consistent formatting
General Tips
- Start with a template - The Classic template is a proven starting point
- Create multiple layouts - Different audiences need different information
- Name layouts clearly - Use descriptive names like “Warehouse - Detailed” or “Customer - Summary”
- Keep it simple - Don’t overwhelm with too much information
- Consider print format - Test how it looks when printed or saved as PDF
Troubleshooting
Block Not Displaying
Check if:
- The block has visibility conditions that aren’t being met
- You’re viewing the correct section (Header/Container/Footer)
- The block is within the canvas bounds
Layout Looks Different Than Expected
- Refresh the preview to see latest changes
- Verify block settings are configured correctly
Can’t Edit Template
System templates (like Classic) are read-only. Create a copy to customize:
- Click the copy icon next to the template
- Edit your copy
Related Documentation
- Load plan view settings - Temporary display options
- Load plan sharing - Share loadplans with clients
- Creating a load plan - Getting started tutorial